Look no further! Here is a list of my digital products that can be completed in Google Drive and found in my TpT store. There are even some time saving products created just for teachers. Some of these are FREE so be sure to check them out :) Then read on to find out different ways you can distribute these activities to your students.
I will be adding a lot more to the list in the next few months!
Often times I get questions from teachers about how they can distribute these digital activities to their students. Well, you have options...
Then click "My Groups".
Replace the highlighted text with the word "copy".
Now when the link is clicked, you are prompted to make a copy.
Often times I get questions from teachers about how they can distribute these digital activities to their students. Well, you have options...
If I were a classroom teacher then Google Classroom would be my choice for distributing digital materials to my students. Why? Because you can link in a file and set it to automatically make a copy when the student clicks on the link. Google Classroom sends the file (that is automatically renamed with the assignment name as well as the student's first and last name) straight to a Google Classroom folder in THEIR Drive as well as a folder in the TEACHER'S Drive. Google Classroom is very easy to set up and your students can join by simply entering a code or you can add their email address. *Currently you have to have Google Apps for Education to access Google Classroom*. HERE are some directions an ITRT in my county put together to help teachers get setup.
Once you have your Google Classroom class set up, be sure the file you want to distribute is in your Drive.
Once you have your Google Classroom class set up, be sure the file you want to distribute is in your Drive.
Next, click on "Create Assignment".
 |
| This screenshot is from an actual 5th grade Google Classroom. Notice how I could also be a "teacher". Teacher admin privileges are not limited to just one teacher :) |
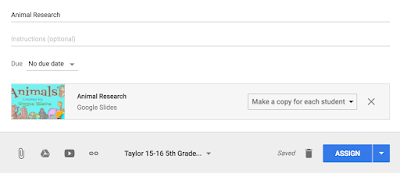
Then type in the name of your assignment and click on the Drive icon.
Locate your file in your Drive and click the blue "Add" button.
Decide if you want a "due" date. Often times I do not include a due date for elementary students since we don't always have access to devices.
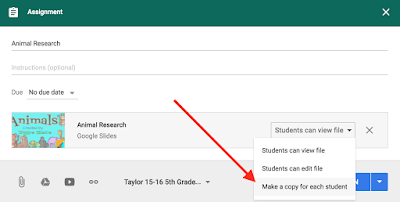
Finally, select "Make a copy for each student" from the dropdown menu and click "Assign".
It will then appear in your Google Classroom feed for students to access.
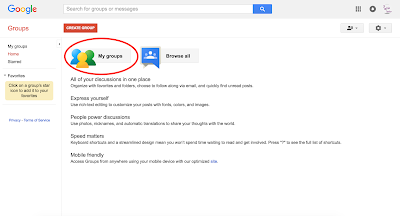
If Google Classroom isn't your "thing" then you can send the assignment straight to your students by sharing with their Google accounts. Many school systems have distribution lists already in place so that you don't have to type each students' Google address into the "Share" box. If you are not aware if you have a distribution list set up for your class, first check "Groups":
Then click "My Groups".
If no group addresses exist, then I would take the time to create a group with all of your student Google addresses. This will save time down the road. Then, whatever you end up naming your group is what you would type in the "Share" box. To share, open the activity you want to send your students and click the blue SHARE button.
If you would like for your students to edit what you are sharing with them, change the "Anyone with the link can..." dropdown to say EDIT. If you just want them to VIEW it, leave it on "can view". Afterwards, type the name of your contact group into the box under "People".
This option works well when you want your students to collaborate on the SAME doc or presentation. However, if you want them to work on their own, they would need to go to File>Make a Copy and rename their file. Then if YOU, the teacher, wanted to see their work, they would have to share it back to you. Whew. Too many steps for me!
Before Google Classroom launched, many of my teachers used Shared folders to distribute and collect work in Drive. You can create and shared a folder with all of your students. Then, whatever you put in that folder will automatically pop up on their end. Students would need to go to File>Make a Copy if you wanted them to work on their own assignment. They would then need to drop the copy they made back into a shared folder they have with you, the teacher. You could set up folders for each student WITHIN the one shared class folder but this would mean all of the students in the class would have access (code for CAN DELETE) each other's work. Or, students can create a folder to share with the teacher's email address and the teacher only has access to the files.
Another way to distribute digital Google activities would be to place a link to the product that you set to automatically make a copy when the students clicks the link on your class blog, website, server or Learning Platform. To do this, open your digital activity. Highlight the word "edit" and everything after in the url.
Now when the link is clicked, you are prompted to make a copy.
This is how I distribute my Google products to my customers. Once they make a copy and rename it, the product is sent straight to their Drive and I don't have to worry about anyone disrupting my original file. Note: If you choose to use this method with your students, be sure to have them sign into their Google account FIRST.
Did you know that you can still use Google Apps even if your students do not have accounts? The benefit of this method is that anyone you share the activity link with can view and/or edit without having to login. This is GREAT for those K/1 students who haven't quite mastered typing in their incredibly long username and password. Just set the sharing privileges to anyone with the link can view or edit (depending on what you want them to accomplish) and add the link of the activity to the area your students go to access links/websites you share. If you are having your students edit/manipulate anything on the activity you share, be aware that they will all be on the SAME document working collaboratively. You would have to create a copy for EVERY child and add EVERY link to each copy to your "go to" website/link area if you want each child to work on their own activity.
Students can manipulate shapes/images as well as add text even though they don't have a Google account. They just can't insert their own images.
If you haven't implemented digital activities in your classroom, I highly encourage you to give it a try!
Follow me on Pinterest to get more techie ideas:


